Atomic Force Microscopy (AFM) has become a valuable tool for imaging and accurate measurements on the micrometer and nanometer scale. In order to validate the measuring capabilities, the AFM system need to be correctly calibrated. On this page you will find a selection of affordable and accurate AFM calibration standards for Z-axis and X-Y-axis calibration:
- The HS series with 20nm, 100nm and 500nm calibrated Z height also offer X–Y calibration for larger scanners in the 40-100µm range.
- The CS calibration standard with 20nm Z height also enables X- Y-axis calibration at a smaller scanner size in the µm range.
- The CS and HS series AFM calibration standard structures are all fabricated on a Si chip which is mounted on a 12mm stainless steel AFM disc with electrically conductive epoxy resin.
TG series AFM / SPM calibration and test gratings
The TGX and TGF11 test gratings are particularly useful for lateral calibration and to assess scanner non-linearity both in lateral and vertical directions. Other parameters to determine are: hysteresis, creep and cross coupling effects. Etched into silicon along the (111) crystallographic planes. Typical radius of the edges is less than 5nm.
#34-030020 HS-20MG AFM XYZ calibration standard, 20nm Z
The HS-20MG is predominantly a height calibration standard with a 20nm calibrated height. It consists of silicon dioxide structures on a 5x5mm silicon chip. The fabrication process guarantees excellent uniformity of the structures across the chip. The calibration area is located in the centre of the silicon chip and consists of a larger square of 1x1mm with square pillars and holes with a 10µm pitch. In the centre of this square resides a smaller square of 500×500µm with circular pillars and holes with a 5µm pitch.
This design also allows for X- / Y-axis calibration for biggers scanners in the 10-40µm range. The structure symmetry of the HS-20MG enables calibrating your AFM system in one step without rotating the sample in between X- and Y-axis calibration.
The HS-20MG can be supplied as mounted on a 12mm metal AFM disc using electrically conductive epoxy resin or as unmounted. The exact height value is stated on the label of the HS-20MG.
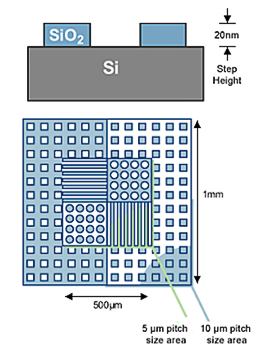 | HS-20MG AFM XYZ calibration standard, 20nm Z |
|---|---|
| Product # | Unit |
| 34-030020 | mounted on 12mm AFM disc |
| 34-030021 | unmounted |
#34-030100 HS-100MG AFM XYZ calibration standard, 100nm Z
The HS-100MG is predominantly a height calibration standard with a 100nm calibrated height. It consists of silicon dioxide structures on a 5x5mm silicon chip. The fabrication process guarantees excellent uniformity of the structures across the chip. The calibration area is located in the centre of the silicon chip and consists of a larger square of 1x1mm with square pillars and holes with a 10µm pitch. In the centre of this square resides a smaller square of 500×500µm with circular pillars and holes with a 5µm pitch.
This design also allows for X- / Y-axis calibration for biggers scanners in the 10-40µm range. The structure symmetry of the HS-100MG enables calibrating your AFM system in one step without rotating the sample in between X- and Y-axis calibration.
The HS-100MG is either supplied as mounted on a 12mm metal AFM disc using electrically conductive epoxy resin or unmounted. The exact height value is stated on the label of the HS-100MG.
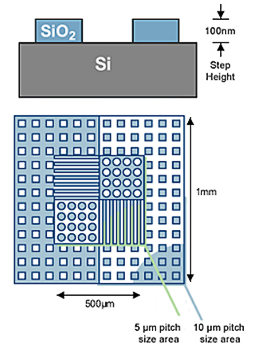 | HS-100MG AFM XYZ calibration standard, 100nm Z |
|---|---|
| Product # | Unit |
| 34-030100 | mounted on 12mm AFM disc |
| 34-030101 | unmounted |
#34-030500 HS-500MG AFM XYZ calibration standard, 500nm Z
The HS-500MG is predominantly a height calibration standard with a 500nm calibrated height. It consists of silicon dioxide structures on a 5x5mm silicon chip. The fabrication process guarantees excellent uniformity of the structures across the chip. The calibration area is located in the centre of the silicon chip and consists of a larger square of 1x1mm with square pillars and holes with a 10µm pitch. In the centre of this square resides a smaller square of 500×500µm with circular pillars and holes with a 5µm pitch.
This design also allows for X- / Y-axis calibration for biggers scanners in the 10-40µm range. The structure symmetry of the HS-500MG enables calibrating your AFM system in one step without rotating the sample in between X- and Y-axis calibration.
The HS-500MG is supplied either mounted on a 12mm metal AFM disc using electrically conductive epoxy resin or unmounted. The exact height value is stated on the label of the HS-500MG.
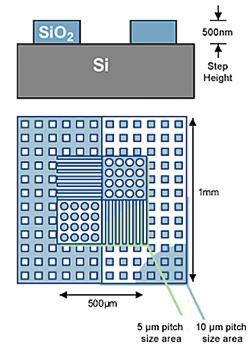 | HS-500MG AFM XYZ calibration standard, 500nm Z |
|---|---|
| Product # | Unit |
| 34-030500 | mounted on 12mm AFM disc |
| 34-030501 | unmounted |
#34-032020 CS-20NG AFM XYZ calibration standard, 20nm Z
The CS-20NG is an XYZ calibration standard with a 20nm calibrated height. It consists of silicon dioxide structures on a 5x5mm silicon chip. The fabrication process guarantees excellent uniformity of the structures across the chip. The calibration area is located in the centre of the silicon chip and consists of a larger square of 1x1mm with square pillars and holes with a 10µm pitch. In the centre of this square resides a medium square of 500×500µm with circular pillars and holes with a 5µm pitch. The small square in the centre has a size of 100×100µm and contains circular holes with a 500nm pitch.
This design of the nanogrid allows for both laterial and vertical scanner calibration. The structure symmetry of the CS-20NG enables calibrating your AFM system in one step without rotating the sample in between X- and Y-axis calibration.
The CS-20NG is supplied either mounted on a 12mm metal AFM disc using electrically conductive epoxy resin or unmounted. The exact height value is stated on the label of the CS-20NG.
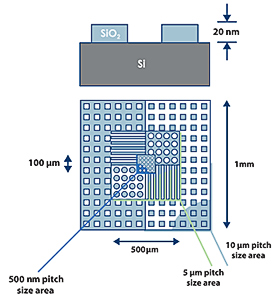 | CS-20NG AFM XYZ calibration standard, 20nm Z |
|---|---|
| Product # | Unit |
| 34-032020 | mounted on 12mm AFM disc |
| 34-032021 | unmounted |
#34-033010 TGX AFM / SPM calibration grating, 3um pitch, undercut edges
The TGX calibration grating with an undercut edge is made by two-dimensional anisotropic etching along the (111) crystallographic planes of silicon. Typical radius of the edges is 5nm. The TGX calibration grating is intended for lateral calibration of SPM scanners, but is equally useful for detection of lateral non-linearity, hysteresis, creep, cross-coupling effects and determination of the tip aspect ratio. Calibrated pitch is 3um with a non-calibrated step height of 1um. Chip size is 5x5x0.3mm with an active area of 1x1mm. Supplied either unmounted or mounted on a 12mm AFM disc.
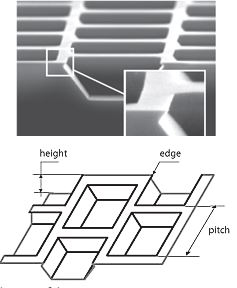 | TGX AFM / SPM calibration grating, 3um pitch, undercut edges |
|---|---|
| Product # | Unit |
| 34-033010-U | unmounted |
| 34-033010 | mounted on 12mm AFM disc |
#34-033030 TGF11 AFM / SPM calibration grating, 10um pitch, trapezoid structure
The TGF11 calibration gratings exhibit a one-dimensional arrays of trapezoid steps. These steps are etched into a silicon substrate along the (111) planes in mono-crystalline silicon. The result is a planar structure with smooth sidewalls on the trapezoid at an angle of 54.74°. The TGF11 grating is useful for assessment of scanner non-linearity in the vertical direction. Calibration of the lateral force can be obtained by analyzing the contact response on the flat and sloped planes. Calibrated pitch is 10um with a non-calibrated step height of 1.75um. Chip size is 5x5x0.3mm with an active area of 3x3mm. Supplied either unmounted or mounted on a 12mm AFM disc.
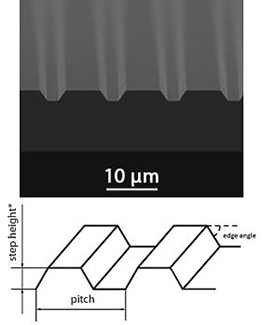 | TGF11 AFM / SPM calibration grating, 10um pitch, trapezoid structure |
|---|---|
| Product # | Unit |
| 34-033030-U | unmounted |
| 34-033030 | mounted on 12mm AFM disc |